
Master Day Trading in Just 30 Days: Lesson #6
06
Lesson #6
In this sixth installment of our day trading training series, we are still continuing to focus on order entry drills. So far, we have drilled entering market and limit orders. And while the last lesson required more focus and concentration than the prior one, this one will up that requirement even more. In this one, you will be entering and managing 3 different order types.
(And of course, if you’re here, then we will assume that you already have your trading environment set up, so we’ll just jump straight into a description of the drill. If not, then please review the last few lessons before continuing on.)
Modify Your Chart
For this drill, you will have to add a new item to your chart. Please add another Keltner Channel overlay indicator, but this time you should set the parameters as follows:
- Set the ATR parameter to 5.5
- Set the moving average length to 20.
- In Tradestation, the ATR parameter is called “NumATRs” and the moving average length is called “Length”. Other software platforms will refer to these parameters using different names.
Your chart should now look similar to this one:
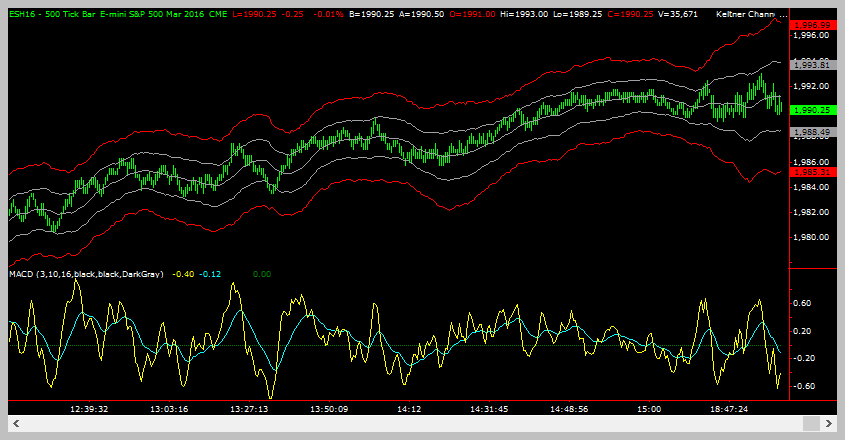
In the chart above, the second set of Keltner Channels are shown in RED.
Drill #3: Entering Market Orders, Limit Orders, AND Stop-Market Orders
OK, so for this exercise, you are going to enter market orders to initiate long trades, LIMIT orders to exit those trades, and Stop-Market orders to protect your position. As with the last lesson, the limit exit orders will move as the price moves. However, the stop-market order that protects your position could ALSO move — it just does not do it very often. Regardless, it does mean that you could be changing the price levels for two orders on every bar (but we suspect that only one order will only have to be modified every 2-3 bars.)
We probably shouldn’t have to tell you this, but just in case, please complete this drill on your simulator!
Need Help Setting Up Your Charts Or Workspace On Tradestation?
Sometimes its just easier to get someone else to set up your charts for you or maybe you just need clarification on the process or exercise. See how much you can get accomplished in one hour with a 60 min 1-on-1 coaching session!
To Enter A New (Long) Trade:
This is the same as the last couple of lessons — you will enter a market order to purchase 1 contract of the e-mini S&P contract (usually symbol ESH16 or similar), when the following condition(s) are met:
- Price pushes below the lower 2.5 Keltner band and then —
- The bar closes, i.e.: the bar that has pushed below the lower 2.5 Keltner band has completed, and a new bar is starting to form.
Notice that we are distinguishing between the different sets of Keltner channels using their ATR length (2.5 vs 5.5).
To Exit Your Trade:
As with the last lesson, you will set a profit level to exit the trade when price touches the middle band. In order to do this, you will enter a limit order to sell at the price level of the middle band as soon as your entry order is filled. As price moves up, the price level of the band will move up. However, do NOT move your limit order. But, if the middle band level moves down, move your limit order to sell DOWN as well. You can never move your limit order up, you can only move it down.
If price touches your limit price but you are not filled, then, when the bar closes and a new one starts to form, you should exit the trade using a market order. Don’t forget to cancel your existing limit order once you are out of the trade.
To Protect your Trade:
To protect your capital in case the market really starts to sell off, you will place a protective stop-market order. This order should be set at the level of the lower band of the new 5.5 Keltner Channel (red on the sample chart above). If, for some reason, the level moves UP and you’re still in the trade, you should adjust the stop-market price. As the 5.5 Keltner Channel moves down you should NOT move the stop-market order down. Doing so would mean that you are increasing your risk.
Summary Of Orders
You are entering and managing three orders when the chart shows your setup:
- A market order to initiate the trade (Long).
- A limit order profit target that moves and that could potentially be converted to a market order if not filled.
- A protective stop-market order that could move but usually does not.
You should try to enter and exit at least 20 of these order sets over the next few days. Don’t forget to cancel any limit or stop-market orders that remain after you exit. You will only be exiting using one order so the other order will remain unless you cancel it. Forgetting to do so is a great way to get into a trade that you do not want. It is also a mistake you will make quite a few times before you get your routine down, where you automatically cancel remaining orders when you exit a trade.
Pro-tip: Many trading platforms allow you to automatically enter the limit exit order and the stop-market order as soon as your entry market order is filled (OSO orders). And they will even cancel the other remaining order when either the limit or stop-market order is filled (OCO orders). This is a great time saver, but not something you should use right now. You need to get your muscle memory built up to be able to enter the four basic order types, so that you can do so without any crutches.
Bonus: You can give yourself bonus points if you keep a spreadsheet of all the trades you make.
Chart Examples
In the chart below, the blue box indicates where you would be entering your market order to initiate a long trade. The red arrows indicate that you will be adjusting your sell limit price down as the middle band moves down. Generally, you will be adjusting your sell limit price on every new bar that is formed. The horizontal line below the blue box illustrates the approximate level at which you will place your stop-market order.
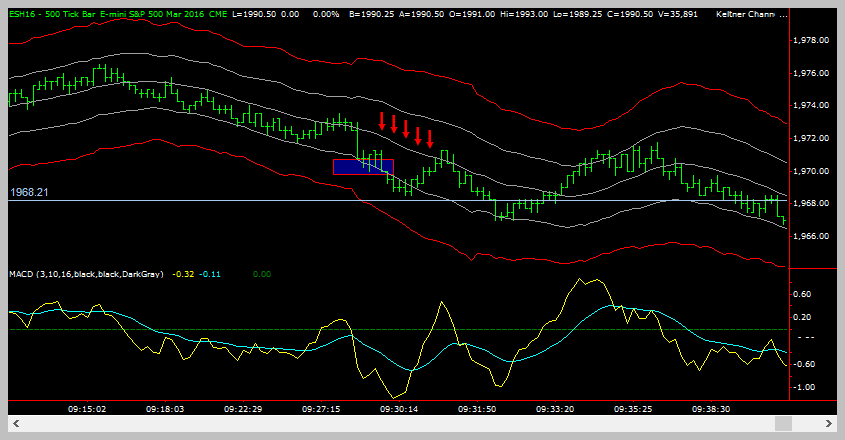
“You need to get your muscle memory built up to be able to enter the four basic order types, so that you can do so without any crutches.”
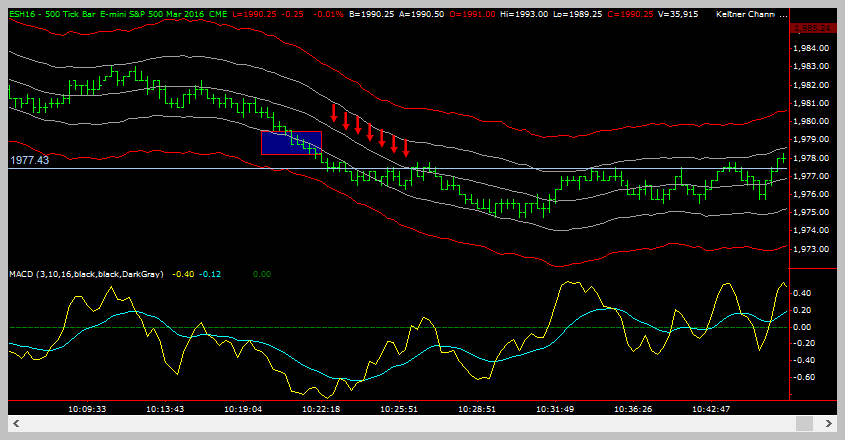
In this second chart example above, the blue box indicates where you would be entering your market order to initiate a long trade. The red arrows indicate that you will be pulling your sell limit price down as the middle band moves down. This example shows a losing trade, where price gets stopped out at the 5.5 lower Kelter Band (horizontal line) before it hits the middle band.
Drill #4: Entering Market Orders, Limit Orders, AND Stop-Limit Orders
Repeat Drill #3, but instead of entering Stop-Market orders you should enter Stop-Limit orders. Everything else remains the same. You should try to enter and exit at least 10 of these order sets. By now, you should be very, very comfortable entering market and limit orders, and even Stop-Market orders, if you finished Drill #3 above. So you only need a few practice runs with Stop-Limit orders to complete this series of practical exercises.

Computer Components.
Photograph provided by shutterstock.om

Financial Instruments
Photograph provided by canstockphoto.com
Terminology
As with the prior lesson, you have a lot of things to do, so there will be no new terms for this lesson.
How do you feel after you have completed this exercise? Let us know by using our contact form! We would love to hear from you!

Wrap Up
So, after the last two lessons and this one, you should be very comfortable entering all order types. And you should have started to develop a decent feel for the rhythms of the ES market. We will transition back to some theory in the next lesson. Just in case you haven’t caught up with all these drills, we’re probably going to skip drills for at least the next couple of lessons. That gives you some extra time to complete these exercises before we move on to a new set.
If you finished up all four drills, you should feel very accomplished. You have done something that most beginning traders never do — practice so that you don’t make rookie mistakes when you do start trading in a live account. These kinds of repetitive, boring exercises are important to develop your muscle memory; in the heat of battle, you can focus on the charts and not worry about the mechanics of entering and exiting trades.

Coming Up Next
- Chart Types
- What Do The Charts Really Tell Us?
- Technical Indicators
Later
- Market structure as shown on charts and how that helps your profitability
- Defining legs and swings on the charts, which will help the precision timing of your trade entries and exits
- All about trend reversals, so you can enter new trends early

PSYCHOLOGY
Why You Should Never Give Up On Trading

TRAINING
Master Day Trading In Just 30 Days: Lesson #1

TRAINING
Three Golden Rules That Could Save You Thousands